Learn how to use the STM ARM Cortex-M3 UART peripheral with CMSIS layer, including IRQ and data echo, using the Keil uVision IDE.
As we could see in the "ARM Cortex Development Overview", the CMSIS layer is a must in the ARM programming, because it allows the same code to work with any other ARM CMSIS compliant microcontroller, however, this example was tested with the STM32F103C8T6 ARM Cortex-M3 model, from STM.
Let's do the following, configure USART1 with IRQ, which will echoes every byte received, except the ASCII 'a', that will return an ASCII "@". This way you can see how to use IRQ, receive, process and send data.
Why some times you say UART and others USART? they are the same, but the USART supports the Synchronous communication mode too. To start create a new project, go to the package manager:
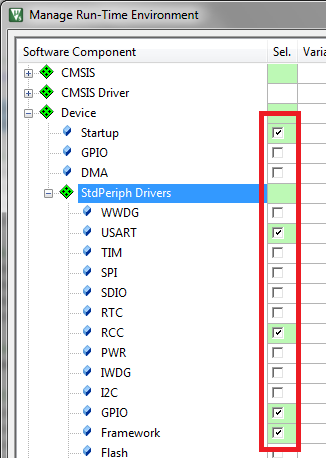
 Select the following elements:
Why some times you say UART and others USART? they are the same, but the USART supports the Synchronous communication mode too. To start create a new project, go to the package manager:

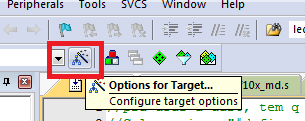
Go to project options:
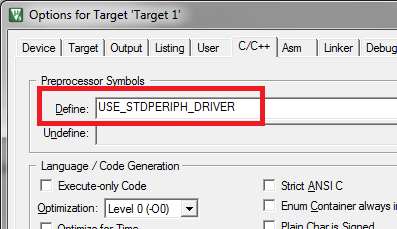
Set the "USE_STDPERIPH_DRIVER" define on the "C/C++" tab:
Now as usual in the ARM, we start enabling the desired peripheral clock:
// Enable USART1, AFIO and GPIOA clock
RCC_APB2PeriphClockCmd(RCC_APB2Periph_USART1 | RCC_APB2Periph_AFIO | RCC_APB2Periph_GPIOA, ENABLE);
Create the USART and GPIO structures, that will store the configurations:
USART_InitTypeDef usart1_init_struct;
GPIO_InitTypeDef gpioa_init_struct;
Configure the GPIOA Pin 9 as the USART1 TX pin:
// GPIOA PIN 9 as USART1 TX
gpioa_init_struct.GPIO_Pin = GPIO_Pin_9;
gpioa_init_struct.GPIO_Speed = GPIO_Speed_50MHz;
gpioa_init_struct.GPIO_Mode = GPIO_Mode_AF_PP;
GPIO_Init(GPIOA, &gpioa_init_struct);
The same for GPIOA Pin 10 as RX:
// GPIOA PIN 10 as USART1 RX
gpioa_init_struct.GPIO_Pin = GPIO_Pin_10;
gpioa_init_struct.GPIO_Speed = GPIO_Speed_50MHz;
gpioa_init_struct.GPIO_Mode = GPIO_Mode_IN_FLOATING;
GPIO_Init(GPIOA, &gpioa_init_struct);
Then configure the USART1 parameters:
// USART1 configurations, 9600 8N1
usart1_init_struct.USART_BaudRate = 9600;
usart1_init_struct.USART_WordLength = USART_WordLength_8b;
usart1_init_struct.USART_StopBits = USART_StopBits_1;
usart1_init_struct.USART_Parity = USART_Parity_No ;
usart1_init_struct.USART_Mode = USART_Mode_Rx | USART_Mode_Tx;
usart1_init_struct.USART_HardwareFlowControl = USART_HardwareFlowControl_None;
USART_Init(USART1, &usart1_init_struct);
And finally enable the USART1 peripheral. the RX and global IRQ:
// Enable USART1
USART_Cmd(USART1, ENABLE);
// Enable RXNE interruption
USART_ITConfig(USART1, USART_IT_RXNE, ENABLE);
// Enable USART1 global interruption
NVIC_EnableIRQ(USART1_IRQn);
Now let's implement the IRQ handler function, which will be called every time a byte is received:
void USART1_IRQHandler(void)
{
 if(USART_GetITStatus(USART1, USART_IT_RXNE) != RESET)
 {
     if((char)USART_ReceiveData(USART1) == 'a')
        USART_SendData(USART1, '@');
     else
        USART_SendData(USART1, USART_ReceiveData(USART1));

 }
}
That's it! Look this code in action:
About the versions
- Keil uVision 5.11.1.0
- ARM Cortex-M3 STM32F103C8T6
0 comentários :
Post a Comment